")
")
In order to use OPLON NETWORKS - Web Application Firewall® (i.e., from now onward simply refered as OPLON - WAF®) as a firewall you have to configure some required parameters. The entire configuration procedure is done by using the Pluribus One WAS® TUI (Text-based User Interface) utility.
Before beginning the configuration it is important to check some prerequisites:
- Pluribus One WAS® must have been already successfully installed.
- A Data Source must have been configured and the data traffic must currently monitored and inspected by Pluribus One WAS®.
- You need root level access to the device where Pluribus One WAS® has been installed and is currently running.
By reading this guide you will learn:
- How to use the Pluribus One WAS® GUI (Graphic User Interface) to check the current system status.
- How to use the Pluribus One WAS® TUI (Text-based User Interface) utility to actually configure the firewall related parameters.
Useful links with further information:
- Official documentation related to OPLON - WAF® : https://www.oplon.net/ .
Note: keep in mind that Pluribus One WAS® TUI (Text-based User Interface) and Pluribus One WAS® GUI (Graphic User Interface) are two different things! Remember that:
- Configuring firewall related parameters is done via Pluribus One WAS® TUI.
- Checking the system's status is done from your web browser via Pluribus One WAS® GUI.
Checking the System's Status
The Pluribus One WAS® GUI provides a dashbord made of many useful widgets. Among these widgets one is extremely useful because it allows to quickly inspect the system's status.
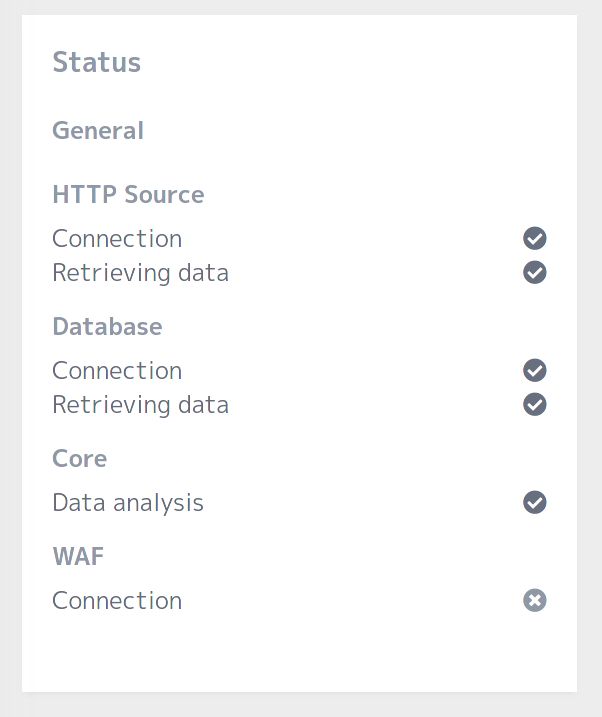
This is the list of the parameters that are related to this guide:
- HTTP Source - Connection: it shows if Pluribus One WAS® is able to establish a communication with the configured Data Source.
- HTTP Source - Retrieving data: it shows if Pluribus One WAS® is actually receiving data traffic from its Data Source.
- WAF - Connection: it shows if Pluribus One WAS® is actually able to establish a communication with a WAF.
Widget Status Before The Configuration
This is the expected status before the configuration:
- HTTP Source - Connection: working.
- HTTP Source - Retrieving data: working.
- WAF - Connection: not working (i.e., because it hasn't been configured).
Widget Status After The Configuration
After performing all the steps described in this guide, this is the status you are supposed to see in the dashboard:
- HTTP Source - Connection: working.
- HTTP Source - Retrieving data: working.
- WAF - Connection: working.
Using Pluribus One WAS® TUI
This section of the article will guide you in the 6-steps procedure required to configure the firewall related parameters.
Step 1 - Open the Shell
Access the host device where Pluribus One WAS® is currently running. On this device open a shell with root level access.
Step 2 - Start Pluribus One WAS® TUI
Within the shell type the following command:
attackprophecy-setup
The configuration utility Pluribus One WAS® TUI will start.
Step 3 - Select your Web Application Firewall
Wait until Pluribus One WAS® TUI loads. Search the drop down menu labeled as Web Application Firewall and use it to select the option LBL Load Balancer.
Step 4 - Confirm your Choice
Press the < Switch WAF > button and wait while Pluribus One WAS® TUI updates the screen.
Step 5 - Set the Parameters
Scroll down and within the Configuration Sections enter in the sub-menu labeled Web Application Firewall. Please set all the required parameters:
- Hosts.
- Port.
- Username.
- Remote Path.
- IP Whitelist filename.
- IP Blacklist filename.
- WAF Rules filename.
The parameters meaning should be easy to grasp. Some additional pieces of advice can be useful:
- The WAF can be distributed on more than one node. This is the reason for the hosts being plural.
- As a user you can insert more than one IP address, one for each node associated to the WAF. Please insert one IP address for each line.
- An SSH connection with a public key is used to manage access to the several hosts. No password is required, just insert the username.
- Access to the nodes hosting the WAF must be based on a single Username.
- The field called Remote Path refers to the path where the protection rules will be uploaded. This path is associated to a system folder within the host device where the WAF is running.
- The fields IP Whitelist filename and IP Blacklist filename are associated to two files that manage protection rules. These rules are Layer 3 level rules associated to IP addresses and can be created by using the Pluribus One WAS® GUI from the view called HTTP Clients.
Step 6 - Confirm
Once all parameters are set please confirm by pressing the < Save and quit > button.